Table of Contents
Checklists Basics
Assigning checklists to team members is a practical approach to ensure efficient task management and promote collaboration within a team. By assigning specific sections to team members and tracking their progress, you can enhance productivity, streamline workflows, and ensure accountability.
Using Checklists
To access you checklists, go to your menu on the left, then click Checklists. If you have no checklists active yet, read Managing Checklists.
Checklists load in a collapsed view by default, showing only the header card. This helps keep the page clean and easy to scan.
Users can expand a checklist at any time to view full details.

Quickly assign Team Members to checklists by using the drag and drop method. With checklists open, expand your lineup with the arrow at the top right of your page, press or click on a Team Members name, then quickly drag to the left and drop in a Checklist section.
Tracking Progress
You can easily track checklists on your Shifts page. Press the ![]() button to have quick access to your checklists.
button to have quick access to your checklists.
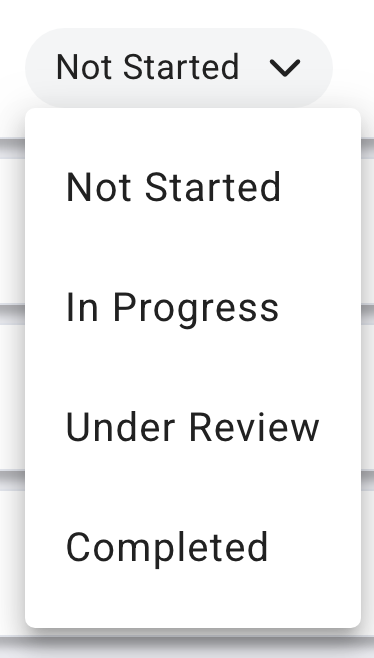
The progress bar on the top of every checklists will help Leaders track progress over time. Dark blue indicates in progress, green indicates almost completed.

The dots next to the Checklist name indicates the number of sections. If greyed, it means the sections are not assigned to anyone. Orange indicates that section is assigned and in progress. Green indicates checklist is completed.

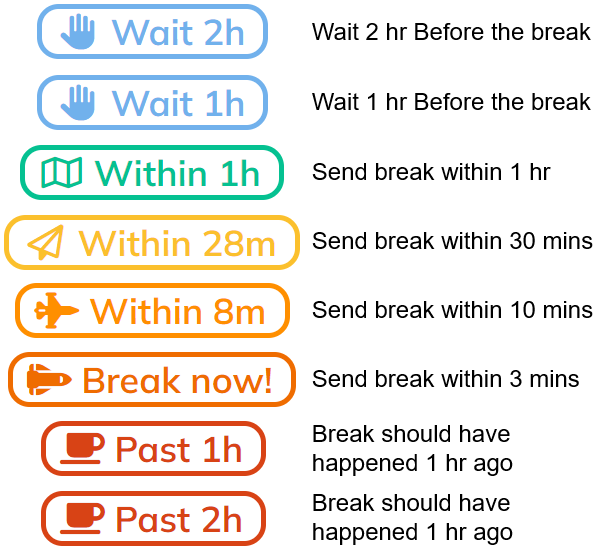
A time stamp indicator will let you know when the checklist needs to be complete. The stamps follow the same rules as the break stamps, but for checklists.

Learn more about Checklists Basics in the video below!
⬆ Back to TopManage Checklists
Here is how you can copy and paste checklists from a spreadsheet or text document into OneClick:
OneClick allows you to configure your checklists using various methods. This includes (hyperlinks to images):
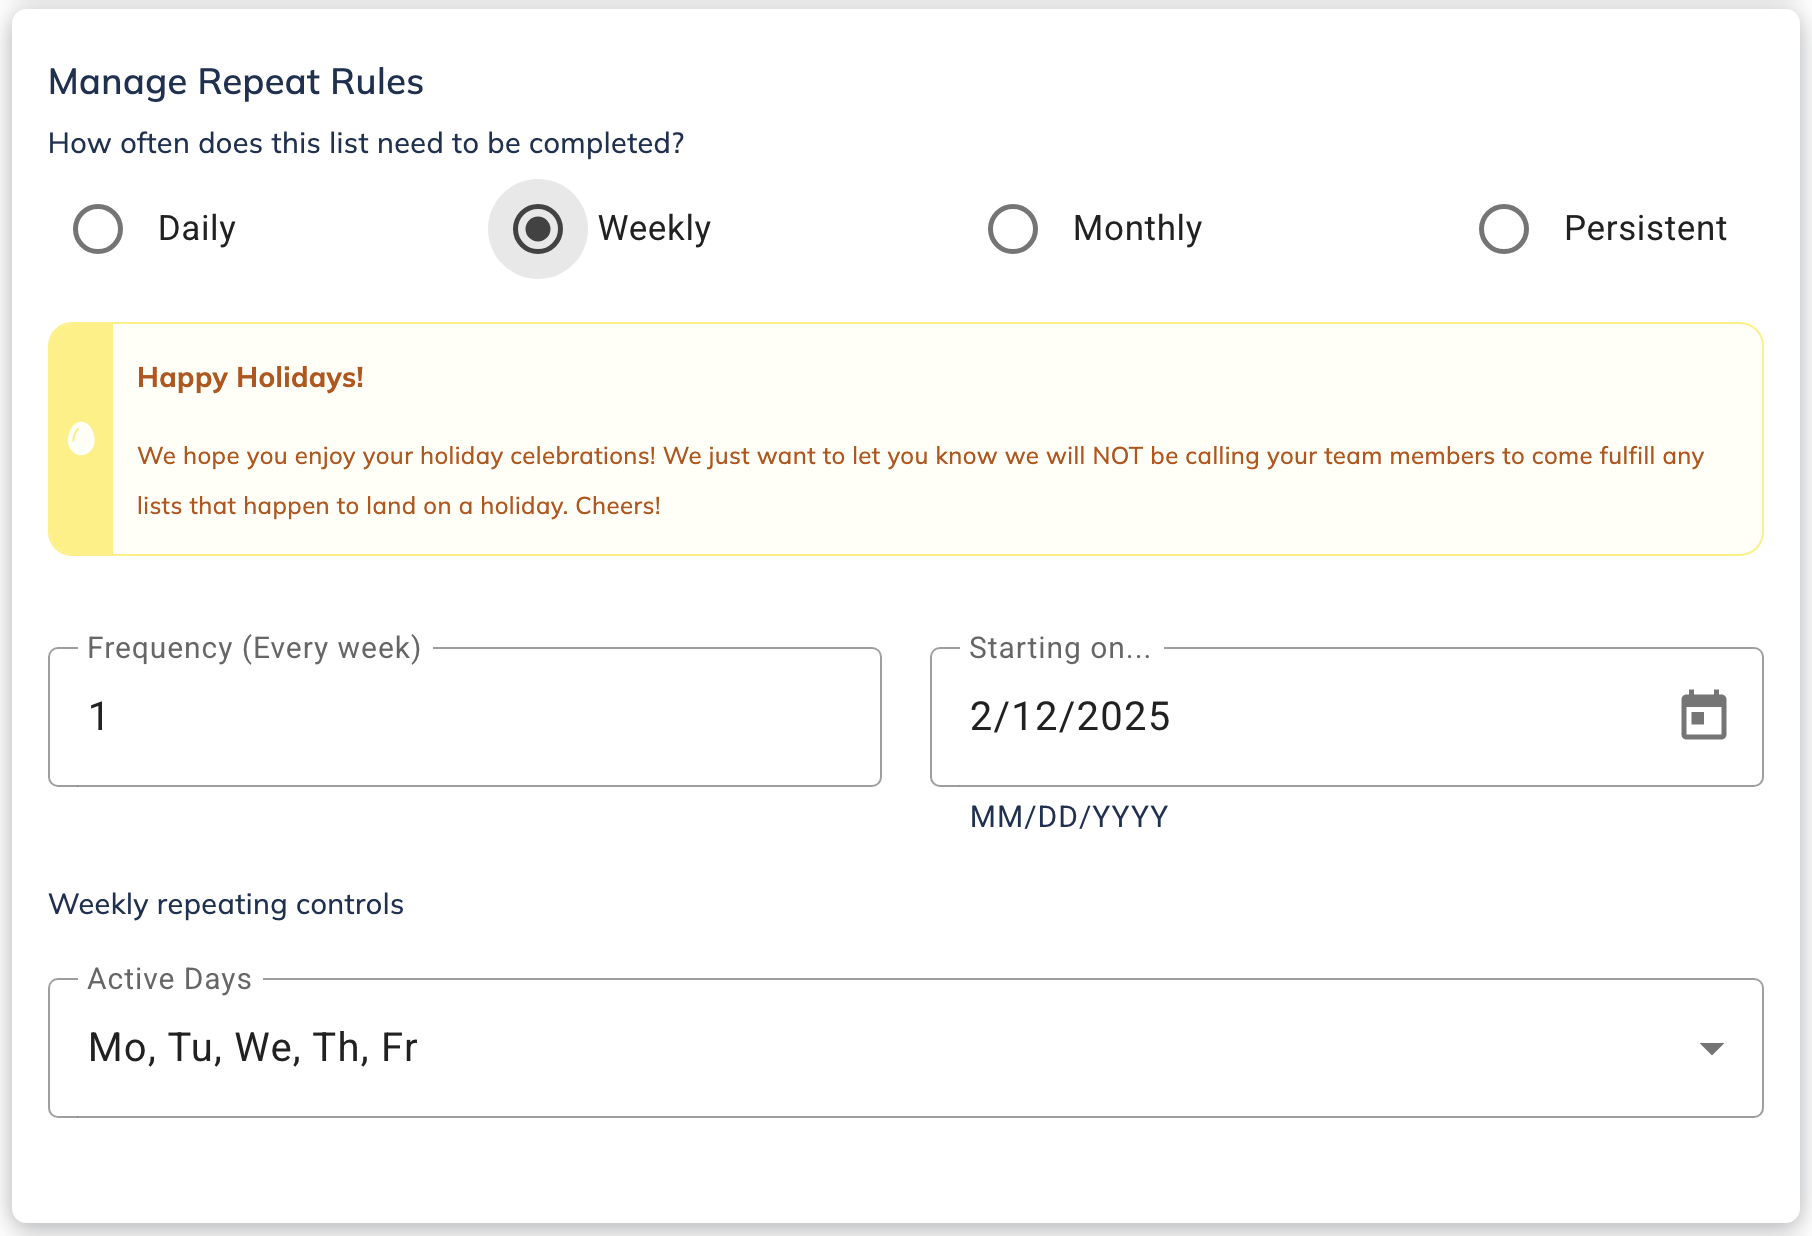
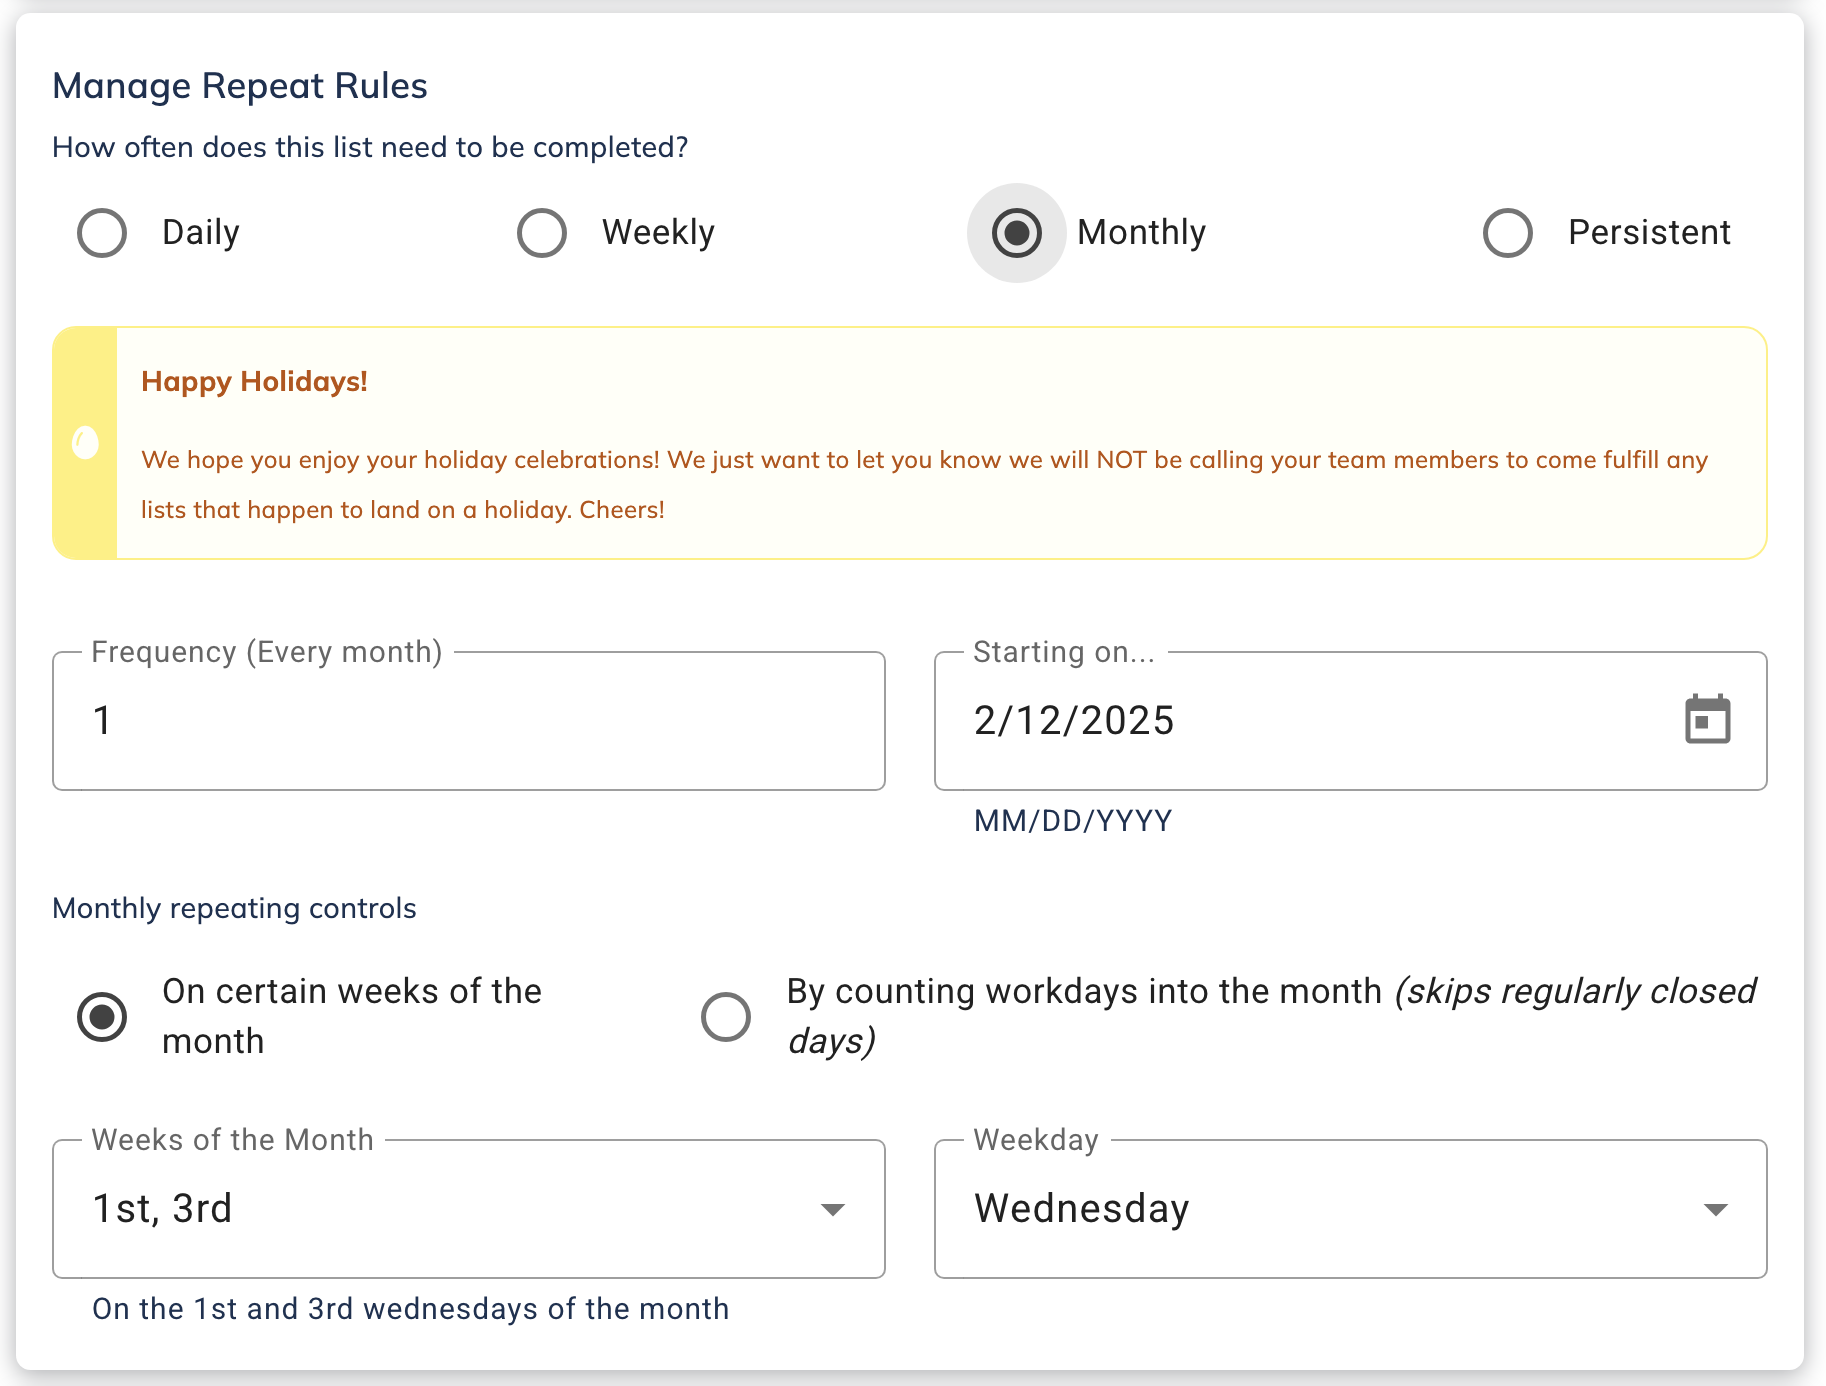
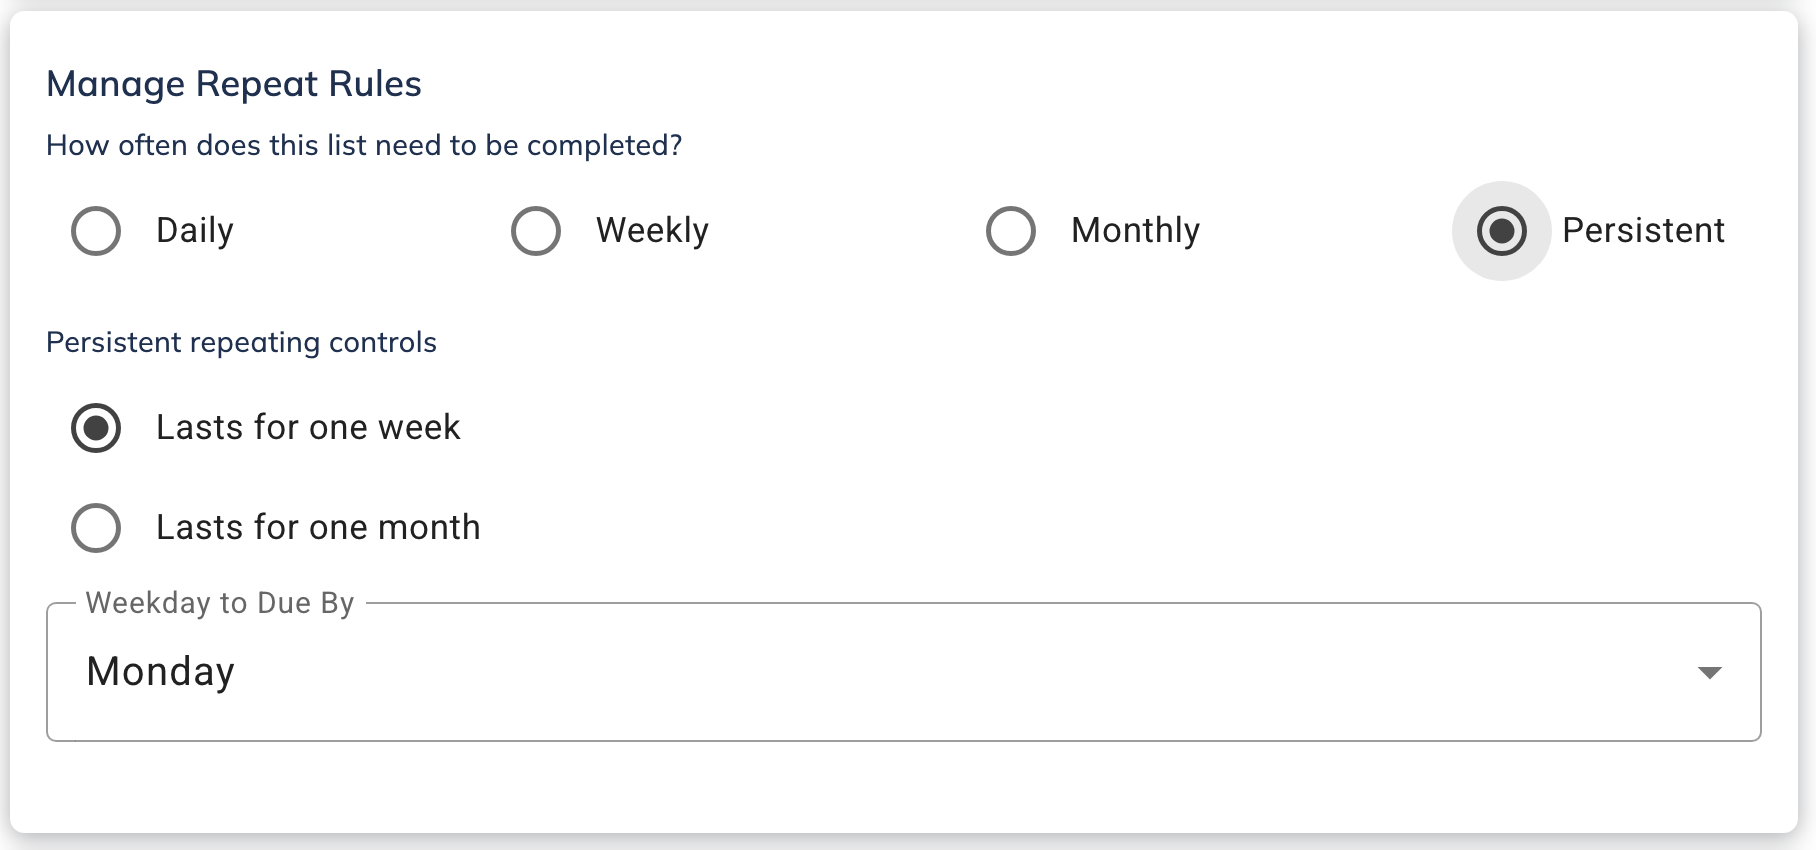
- Repeat rules - daily, weekly, monthly, or persistent
- Timing rules - when the checklist needs to be completed
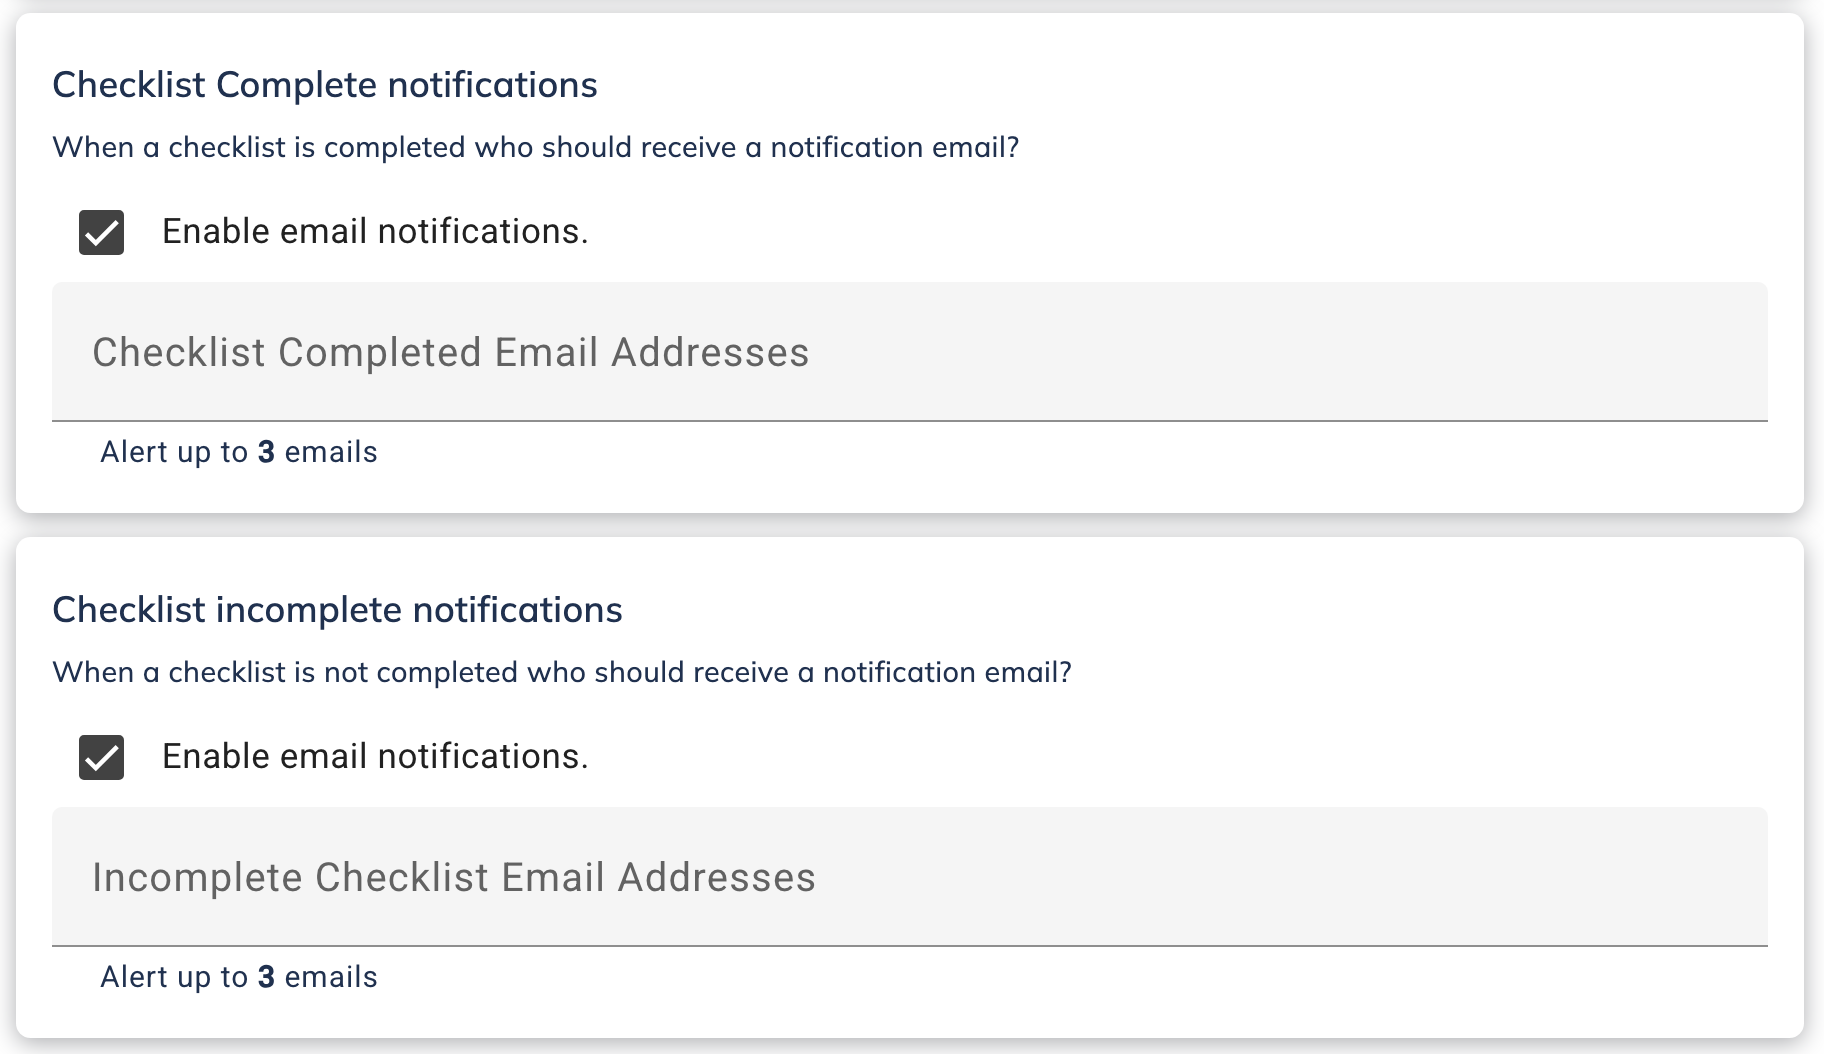
- Notifications - get notified when a checklist is completed or not completed
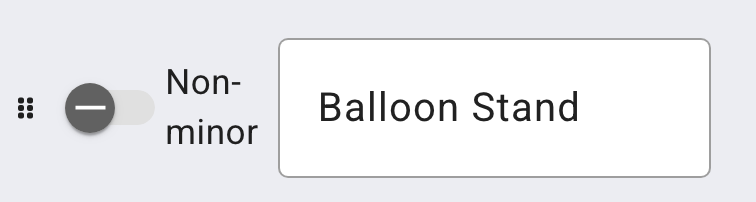
- Non-minor - create checklists/sections that are only for adults.
- Auto-assign - based on permissions (global)
- Tasks - options include:
- Checkmark
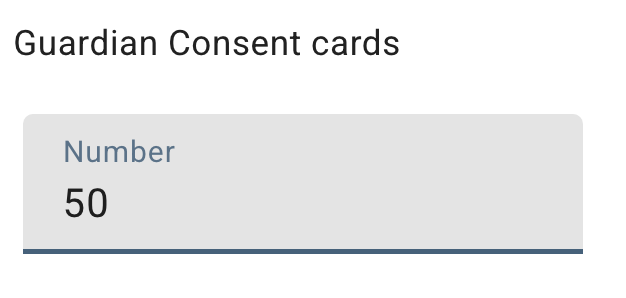
- Number
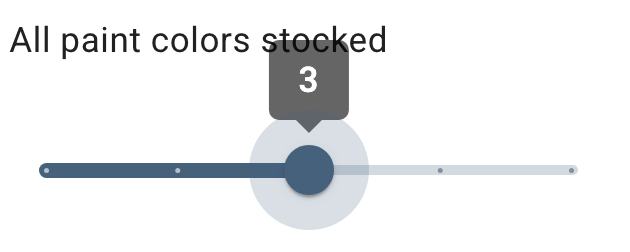
- Slider
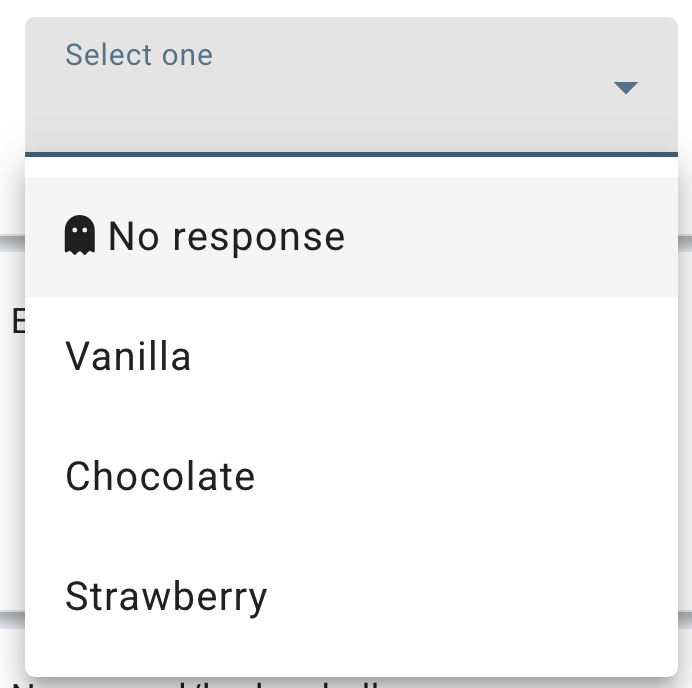
- Dropdown
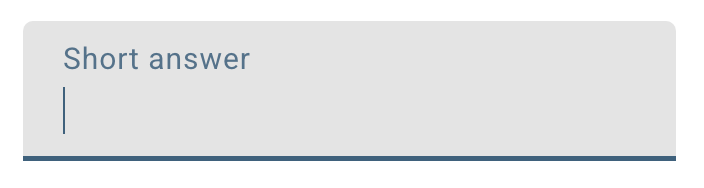
- Short Answer
- Long Answer
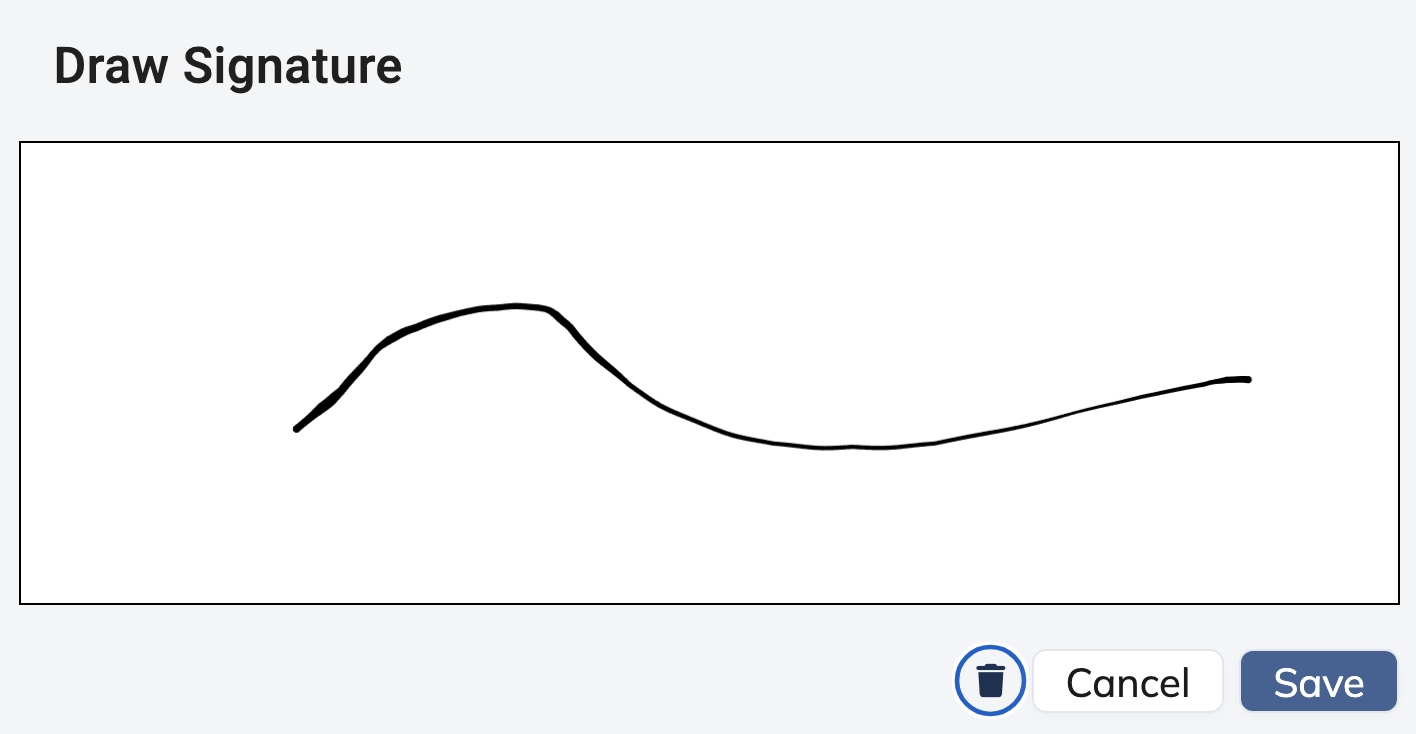
- Signature
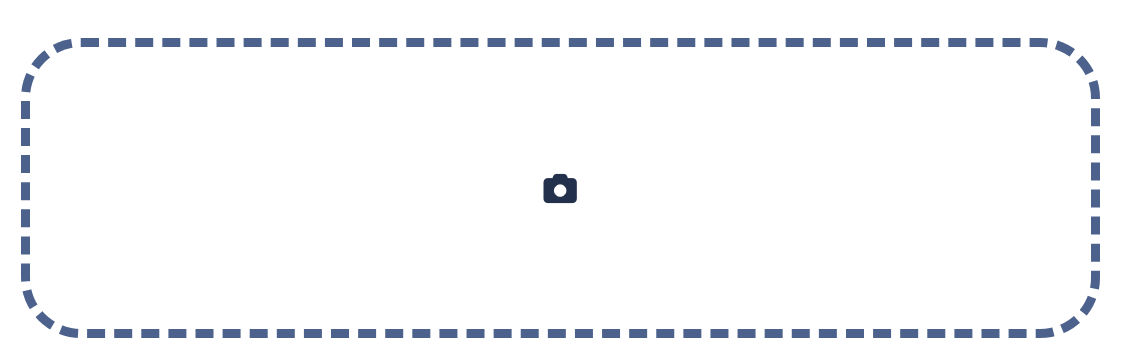
- Photo
- Multiple Phase

If you are a new customer, you will likely not have any active checklists. To start creating, go to Checklists in the left menu, then press "Manage Checklists". You can use a template checklist that was given to you (press "Use" button on checklist template), or press the "+ Create New Checklist" button at top of your screen.
![]()

Repeat Rules
Daily

Weekly
Monthly
Choose a due date between 1 and 31. A new checklist version will also be generated after the due date.
Persistent
Renew on a weekly or monthly basis. By selecting the “Persistent” option, users can set due dates (Sunday-Saturday for weekly, 1-31 for monthly) and ensure checklist items carry over between days, enhancing task management and accountability.
Auto Save for Checklists
Any changes made on the Checklist Settings page are automatically saved to ensure no work is lost. For text-based edits, changes are saved when you click outside of the text field.
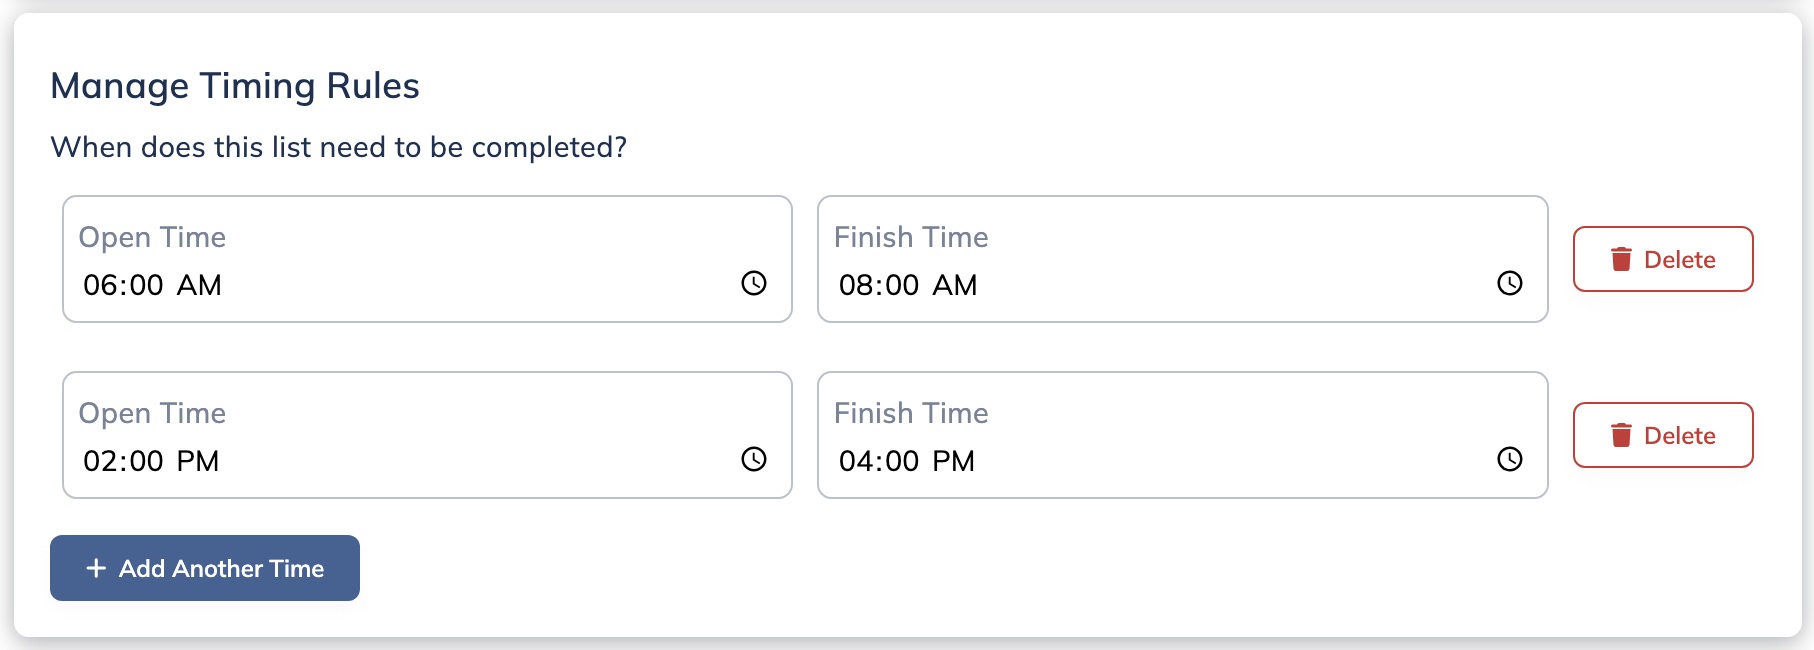
Timing Rules
Notifications
Non-minor
Auto-Assign Checklists
Learn more about Auto-Assign Checklists here.
Tasks
Checkmark

Number
Slider
Dropdown
Short Answer
Long Answer

Signature
Photo
Multiple Phase
When finished editing your checklist, please remember to press "Save". 
Add Photos/Links/Bold
You are able to add example photos or links to checklists/passport using a simple Markdown coding. Read below to learn more.
Photos
- Upload the photo to a cloud storage service like Google Drive.
- Click on the photo and select the 3 dots and open in a new window. NOTE: this will not work when looking at the photo preview, must open in a new window!
- Copy the HASH (random numbers and letters)
- Example: https://drive.google.com/file/d/1IzKVa6SQO3LvoiaLGl1tXkRFEEzGtHEq/view
- Between d/ and/ view HASH = 1IzKVa6SQO3LvoiaLGl1tXkRFEEzGtHEq - Access the passport/checklist manager where you want to add the photo.
- In the task, use the following syntax:
TaskName - Here is a complete example that you can copy and paste to try it out yourself:
Links
- Go into the checklist/passport task where you want the link to be embedded.
- In the task, use the following syntax:
- [taskName](paste_LINK)
- Here is a complete example you can copy and paste to try out for yourself:
- [Basics of OneClick](https://kb.oneclickapp.com/6-minute-product-demo)
- Save the checklist/passport to ensure the link is properly included.
Bold Text
You can emphasize words or phrases by making them bold using either double asterisks (**) or double underscores (__). Simply add these symbols at the beginning and end of the word or phrase you want to make bold.
Example: I want this to be bold
You would add **this.
When rendered in the checklist, it will appear as:

Remember to save the checklist/passport after making the desired text bold
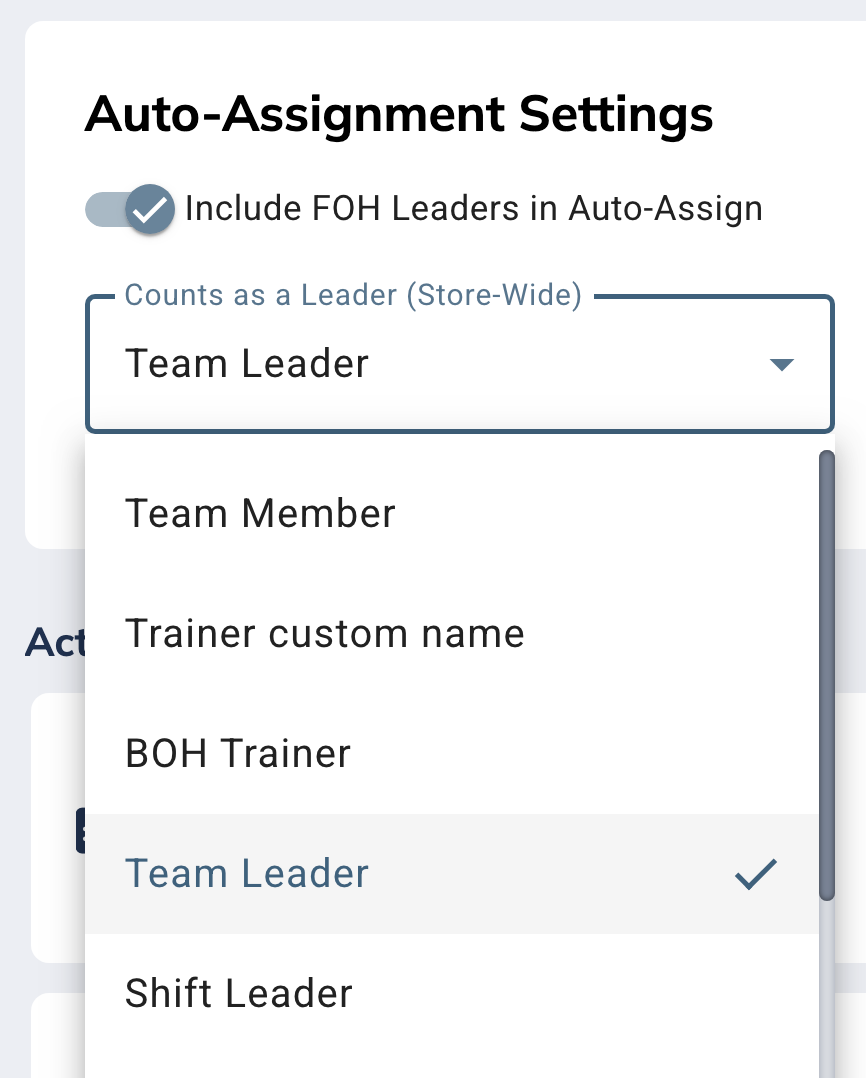
Auto-Assign Checklists
The Auto-Assign Checklist feature allows you to quickly assign Team Members (and Leaders if enabled in settings) to the checklists for that shift. The Auto-Assign Checklist feature takes these things into consideration:
1. Age - will not assign minors to non-minor checklists.
2. Permissions - if permissions are set in "Manage Checklists" to include Leadership, the auto-assign feature will include those permissions in the randomization. Default is to only include Team Members, not leaders.
3. History - the system will look at three factors;
-
Has the person already been assigned to a checklist today?
-
Has the person been assigned this checklist in the repeated time frame (day, week, month)?
-
Not assign the same person to that checklist if they have been assigned to it recently.
Learn more about Auto-Assigning Checklists in the video below!
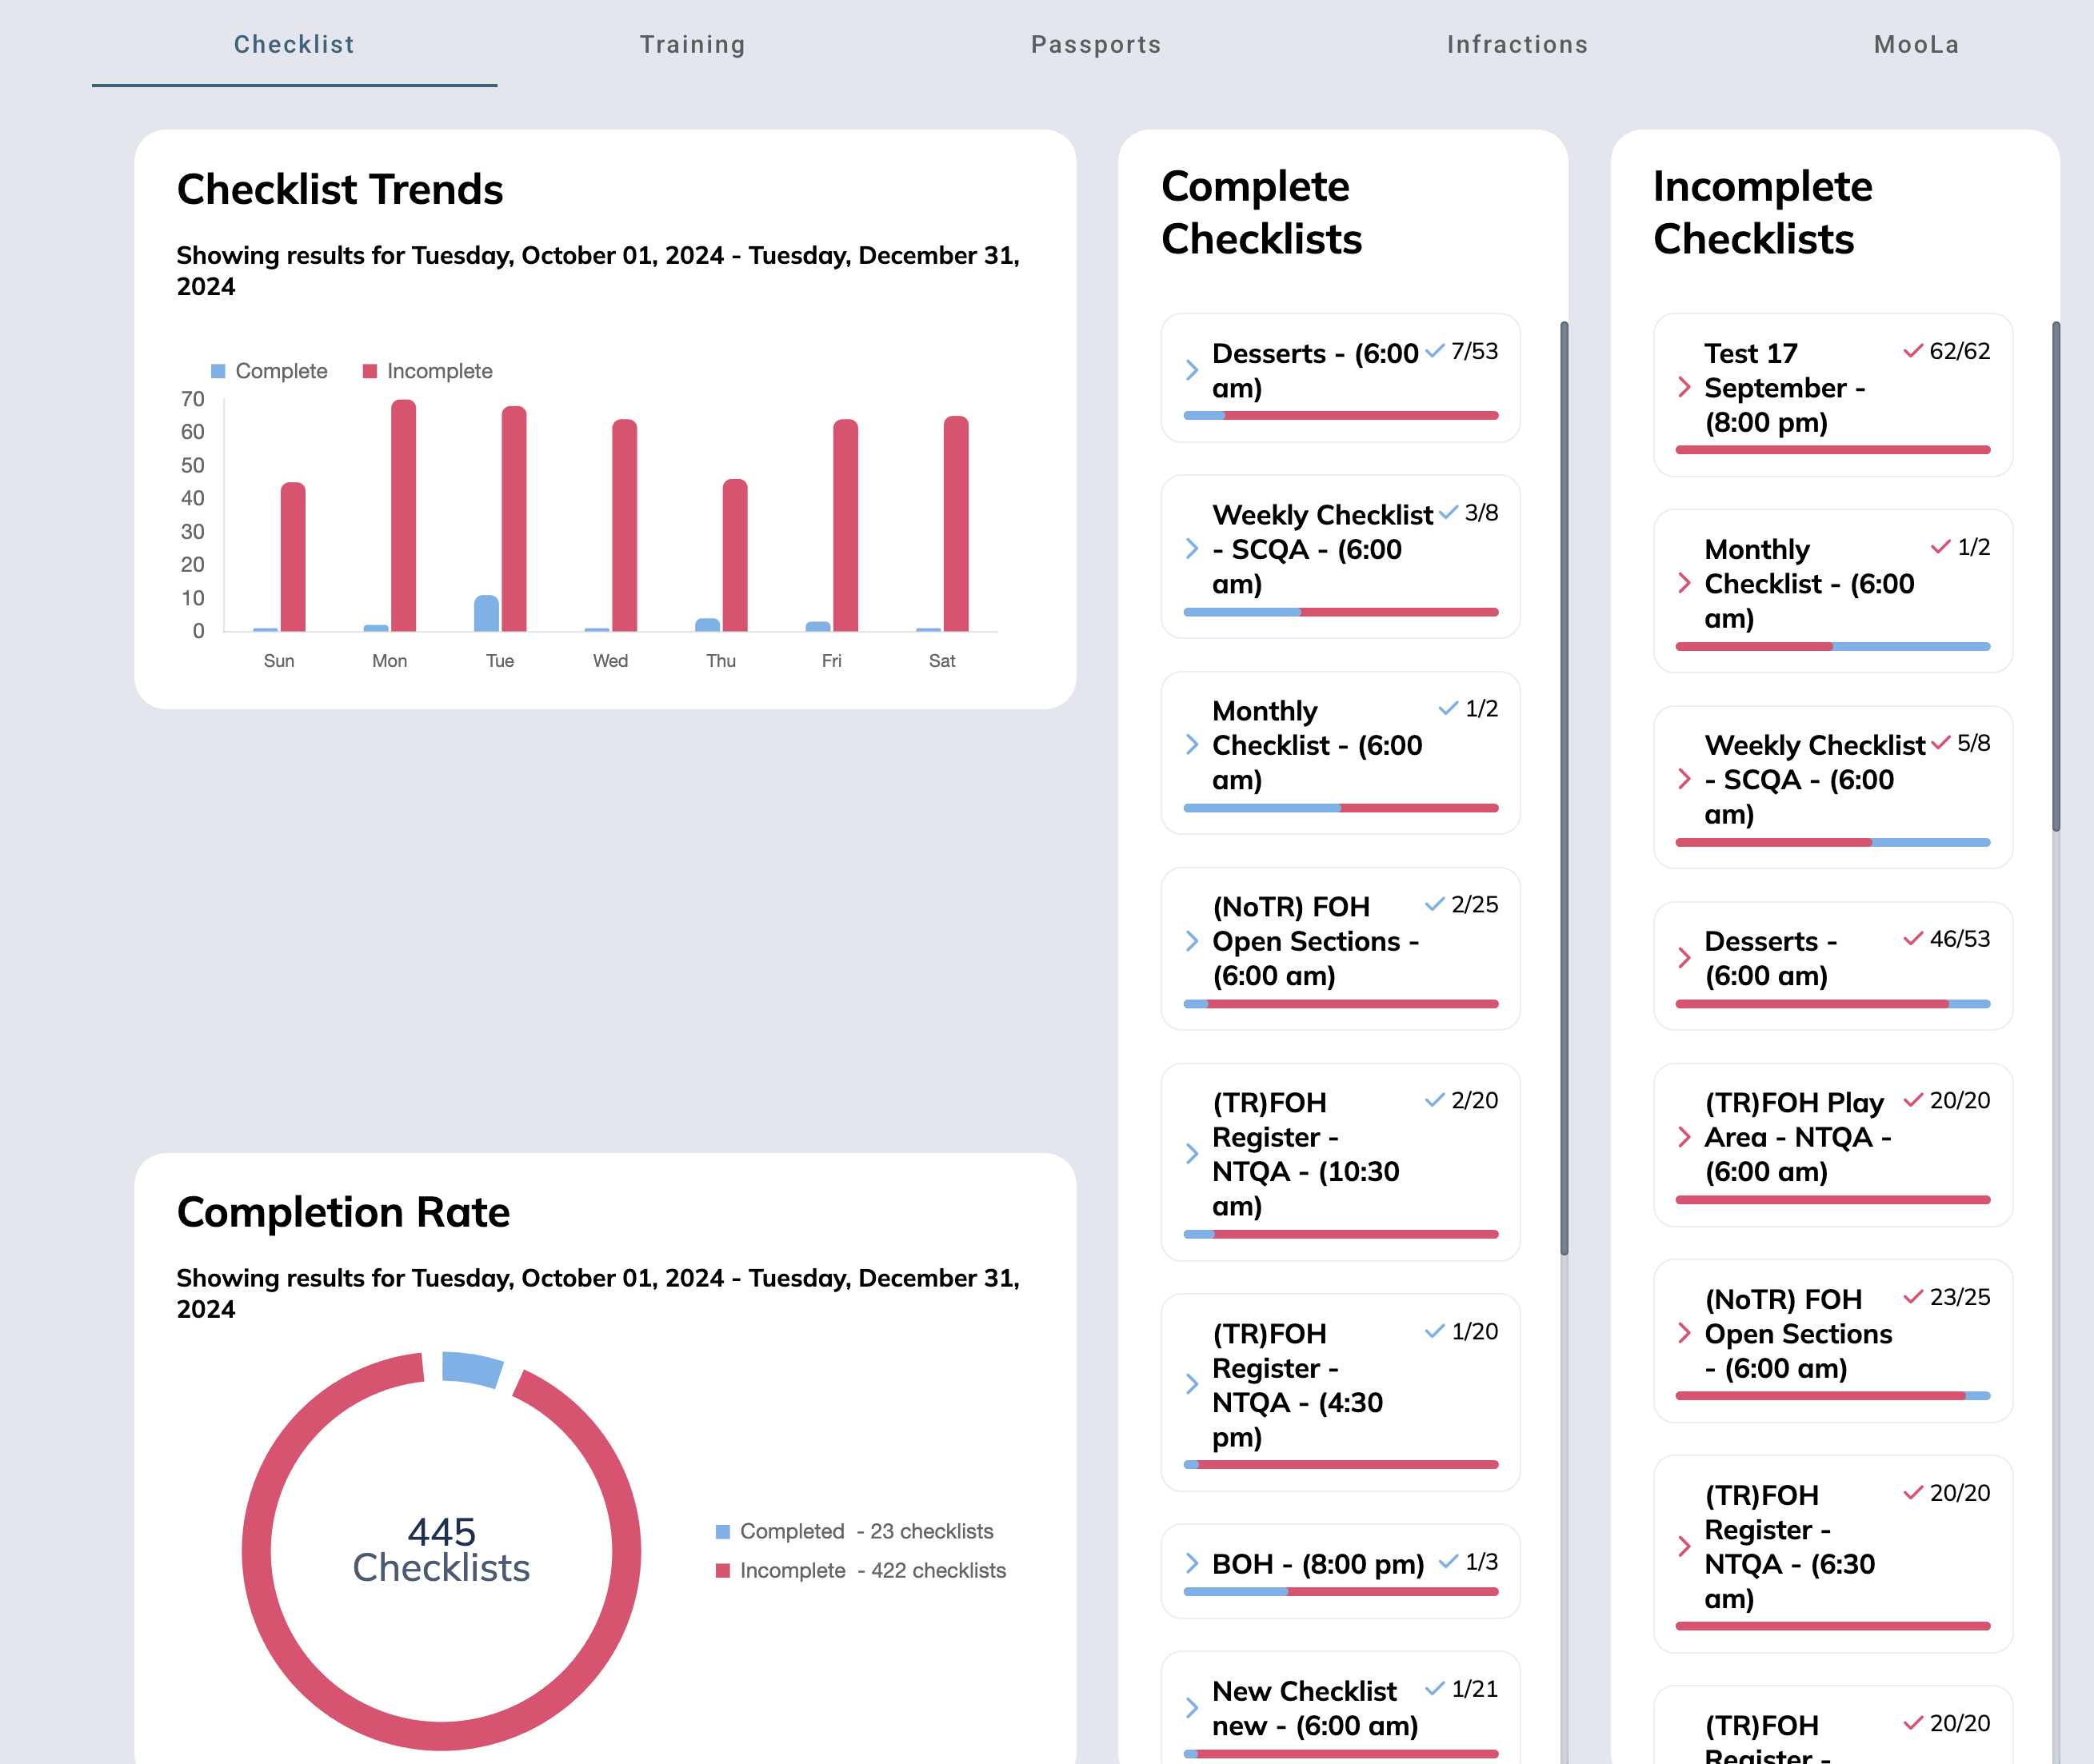
Checklist Reports
To access your checklist reports:
1. Click Reports on your left menu.
2. Go to Checklists. Set your timeframe or date range. Please be patient as the system processes the report.
3. Export on top right if desired.
⬆ Back to Top
Checklist FAQs
When someone completes a task, does it provide a name and time stamp?
Yes...and no. If your store is utilizing the Service Account and have decided to not allow usage of Pins, the tasks will be completed as "Anonymous". If the Team Member logs in with their Pin, then completes the task, the name stamp will show their name.
How will Leaders be notified of checklists due one shifts?
On the Shifts page, there is a Checklist quick-button near the top. This will have a push notification if there are checklists due during that shift time.
Can I disable Auto-Assign Checklist feature?
No. But you can simply not use it.
We are a new store and need help adding our checklist. Can OneClick Support help?
YES! We are here for you! Please Submit a Ticket, send us your checklist files, and we will being the process of customization.
Can we transfer our checklists from Jolt or VSBL?
YES! Please send us the documents (CSV, PDF, Excel are accepted).